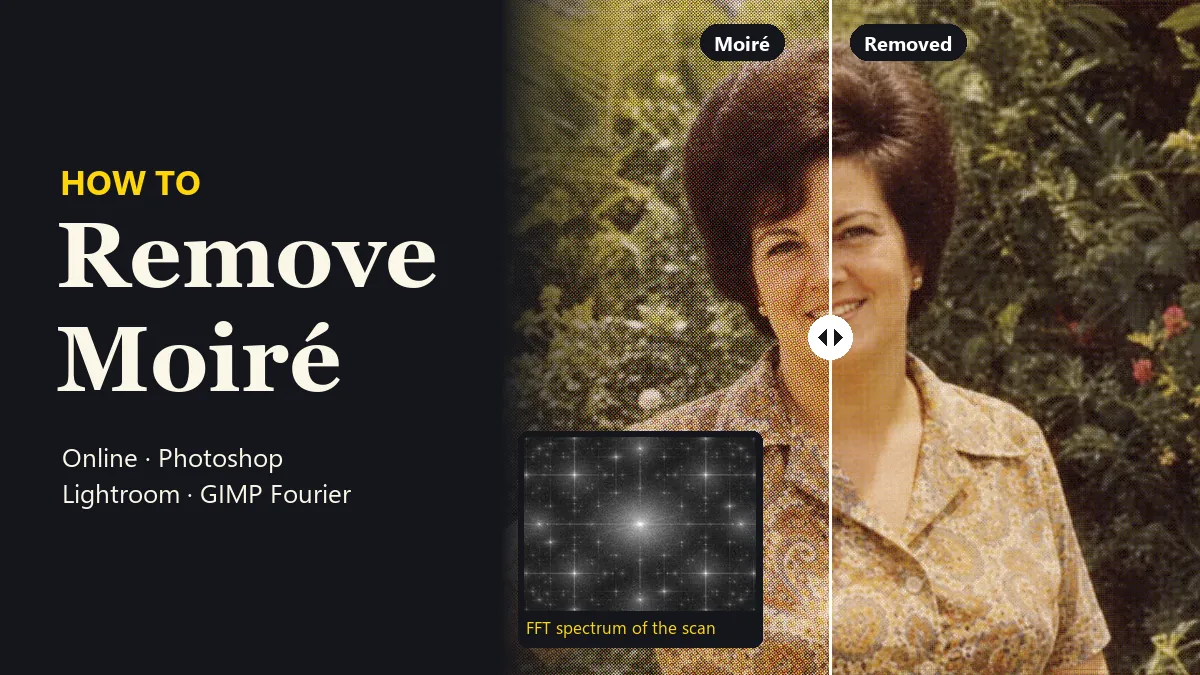
Short answer: to remove a moiré pattern, match the method to the pattern. For a photo of a screen, a striped shirt or any shot you just want fixed, an AI tool such as Moire Fix is the quickest route, and Descreen handles scanned magazines and books. In Photoshop and Lightroom, you brush Moiré Reduction over the area or blur only the color information. In GIMP, the most precise method is the Fourier transform (FFT): the repeating pattern shows up as bright spikes in the frequency spectrum, you paint them out, and transform back.
This guide walks through each method step by step, with worked before-and-after examples, including the GIMP Fourier transform moire method on a scanned halftone print and the fix for scan lines on a white page in GIMP 3.0. If you want to know why moiré appears in the first place, read what a moiré pattern is; here we focus on getting rid of it.
Which Moiré Removal Method Should You Use?
Moiré comes in two flavors, and they need different tools. Color moiré is the rainbow or magenta-green banding you see on fabric and screens. Luminance moiré is the gray, wavy ripple pattern, typical of scans of printed pages and fine grids. Color-only fixes (Lightroom’s slider, Photoshop’s Color blend trick) clear the first but not the second; the Fourier (FFT) method removes either kind as long as the pattern is regular, and AI tools handle both.
| Method | Best for | Effort | Keeps detail? | Cost |
|---|---|---|---|---|
| Moire Fix (AI, online) | Screen photos, fabric, color and gray moiré | Low: upload and pick the source | Mostly; check small text and faces | Free to try with sign-up credits |
| Descreen (AI, online) | Scanned magazines, newspapers, comics, prints | Low | Mostly | Free to try with sign-up credits |
| Photoshop: Camera Raw Moiré Reduction | Color moiré on fabric, limited areas | Medium: brush each area | Yes; heavy settings fade colors | Adobe subscription |
| Photoshop: Gaussian Blur + Color mode | Color moiré on JPEGs | Medium: blur, blend, mask | Yes, brightness detail is untouched | Adobe subscription |
| Moiré slider in Lightroom | Color moiré in raw files | Medium | Yes; gray ripples can remain | Adobe subscription |
| GIMP Fourier transform (G'MIC or Fourier plug-in) | Regular patterns: halftone scans, scan lines, grids | High: find and paint the spikes | Yes, when the spikes are clearly separate | Free (open source) |
| GIMP Levels / Curves | Faint moiré or scan lines on a white page | Low | Yes, on white areas | Free |
| GIMP Despeckle or blur | Mild moiré you can afford to soften | Low | No, it softens the image | Free |
Method 1: Remove Moiré Online With an AI Tool
AI moiré removers don’t blur the pattern away; a trained model separates the interference from the real content and rebuilds the image underneath. That makes them the most practical option for screen moiré, which is hard to fix by hand because it mixes color and brightness ripples that change across the frame.
How to remove moiré with Moire Fix
- Open Moire Fix and upload the photo (JPG, PNG or WebP, up to 10 MB). Use the original file, not a screenshot of it.
- Choose the moiré source: Screen, Fabric or Print / scan, or leave Auto detect on. The quick presets (Screen Photo, Shirt & Fabric, Printed Scan, Heavy Rainbow Bands) set the source and strength in one click.
- Set the removal strength (Gentle, Balanced or Strong) and the output resolution (1K, 2K or 4K).
- Click Remove Moire, drag the slider to compare before and after, and download the result. If faint bands remain, run it again with a stronger setting.


Because the AI reconstructs detail rather than recovering it, compare small text, logos and faces with the original before you publish the result.
For scanned magazines, books and newspapers: Descreen
Printed pages are made of halftone dots, so a scan carries a dot grid that turns into a mesh or moiré as soon as the image is resized. Descreen is tuned for this:
- Upload the scan (JPG, PNG or WebP, up to 10 MB). For a PDF, export the page as an image first.
- Pick the printed material: Magazine / book, Newspaper, Comic or Photo print.
- Choose the descreening strength (Light, Standard or Heavy) and, if you need it, Extra cleanup for dust and specks or glue lines and creases.
- Run Descreen Image, compare, and download at 1K, 2K or 4K.


Method 2: How to Remove a Moiré Pattern in Photoshop
Photoshop has no single “remove moiré” button, but it offers three solid approaches. Work on a duplicate layer (Ctrl/Cmd+J) so you can always compare with the original.
Option A: Camera Raw Filter with Moiré Reduction
Camera Raw has a dedicated Moiré Reduction slider, but only inside local adjustments: an Adobe employee confirmed on Adobe’s forum that it “only exists within Local Adjustments (Masking)”.
- Convert the layer for non-destructive editing with Filter > Convert for Smart Filters (optional, but it lets you reopen the settings later).
- Open Filter > Camera Raw Filter (Shift+Ctrl+A on Windows, Shift+Cmd+A on Mac).
- Click the Masking icon and choose Brush.
- Move Moiré Reduction to the right. A high value makes it easy to see what you paint; you can lower it afterwards. Scott Kelby’s example needed about +50 to +65 on a patterned bag.
- Turn Auto Mask off if it stops the brush from covering the whole pattern, then paint over the moiré.
- Fine-tune the amount, add a second brush for areas that need a different strength, and click OK.
Option B: Gaussian Blur + Color blend mode (or a Lab blur)
This classic trick blurs only the color information. Because sharpness lives mostly in brightness, edges stay crisp while the rainbow banding melts away.
- Duplicate the layer (Ctrl/Cmd+J).
- Apply Filter > Blur > Gaussian Blur with a radius just large enough for the color bands to merge. Fine patterns need a few pixels; broad rainbow bands need much more.
- Set the duplicate’s blend mode to Color.
- Add a layer mask, invert it (Ctrl/Cmd+I) to hide the effect, and paint with white only where the moiré is.
- Lower the layer opacity if the colors look washed out.
The Lab variation does the same thing: switch to Image > Mode > Lab Color, select the a channel in the Channels panel and blur it, repeat for b, leave Lightness alone, then switch back to RGB.
Why the moire effect in Photoshop needs a mask
Here is what the Color-blend blur does when it’s applied to the whole frame instead of a masked area. The rainbow is gone, but so is the color in the photos on the screen, and the gray ripples are still there, because they live in brightness, which this trick deliberately leaves alone.


Option C: Gray (luminance) moiré
For the gray ripples, try Filter > Noise > Median or Filter > Noise > Dust & Scratches on a masked duplicate with a small radius, or Filter > Noise > Reduce Noise. All of them soften detail, so keep the mask tight. For a strong, regular pattern such as a halftone scan, a frequency (FFT) fix is cleaner; see the GIMP method below, which is free.
Method 3: Moiré in Lightroom (Lightroom Classic and Camera Raw)
What is moiré in Lightroom?
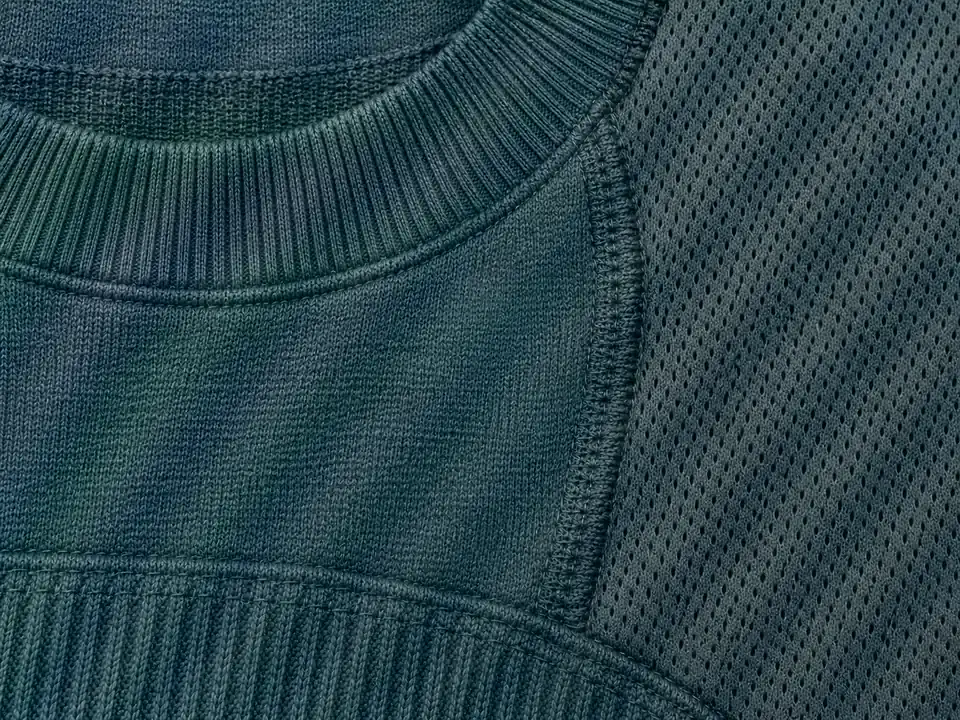
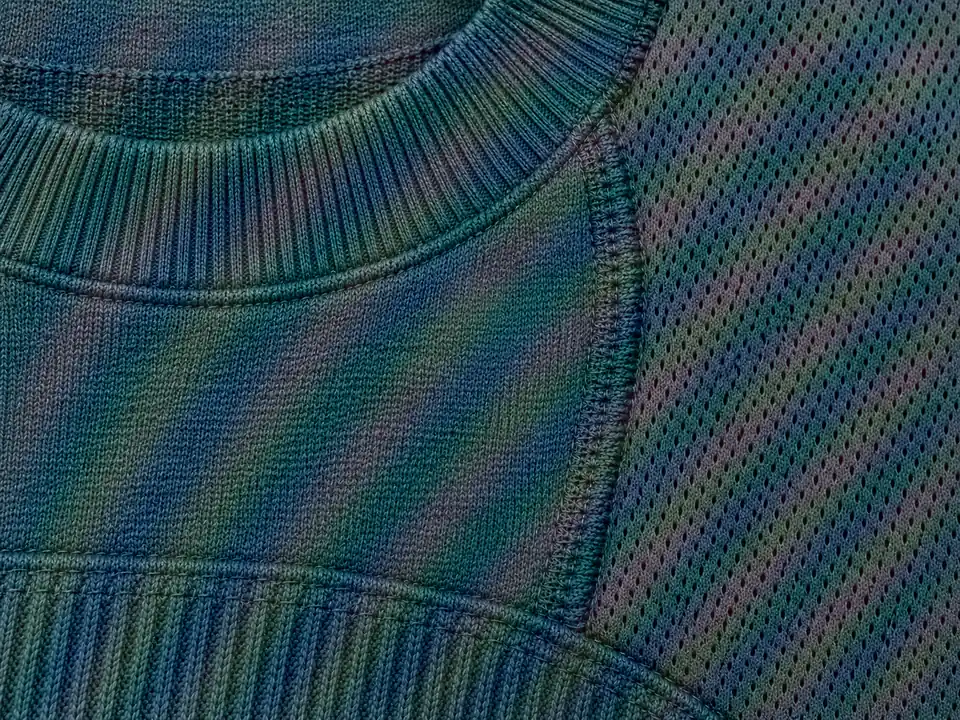
In Lightroom, Moiré is a slider in the masking (local adjustment) panel that reduces moiré, mainly the false color, in the area you paint. It is not in the Basic or Detail panels, so it stays hidden until you create a mask. Photoshop’s Camera Raw uses the same engine and calls it Moiré Reduction.
How to reduce moiré in Lightroom Classic
- Open the photo in the Develop module and zoom to 100% on the moiré.
- Click the Masking icon in the toolbox below the histogram and choose Brush (shortcut K).
- Move the Moiré slider to the right. It sits near the bottom of the mask’s settings, next to Noise and Defringe. A Tuts+ tutorial suggests 60 to 80 as a starting point; positive values reduce moiré.
- Paint over the affected area: the garment, the screen, the patterned surface.
- Check the result at 100%, adjust the amount, and add a second brush mask where the pattern is stronger.
Lightroom moiré: limits and workarounds
- It is mostly a color fix. A user on Adobe’s community forum reports that it removes the magenta and green but leaves an equally visible gray moiré. In a Tuts+ test, pushing the slider to 100 on a barn door barely changed the pattern.
- There is no global slider. If the whole frame is covered, as with most screen photos, you have to brush the whole frame.
- Combine sliders in the same mask: a little Noise for the leftover ripples and slightly negative Sharpness often help.
- Work from raw files when you can, and check the final export size: moiré that is visible at 100% sometimes disappears when the image is downsized for the web, and sometimes appears only then.
Method 4: The GIMP Fourier Transform (FFT) Moiré Method
This is the method GIMP users mean when they search for “gimp fourier transform moire”, and it is the most precise manual fix for regular patterns such as halftone dots, scan lines and screen-door grids.
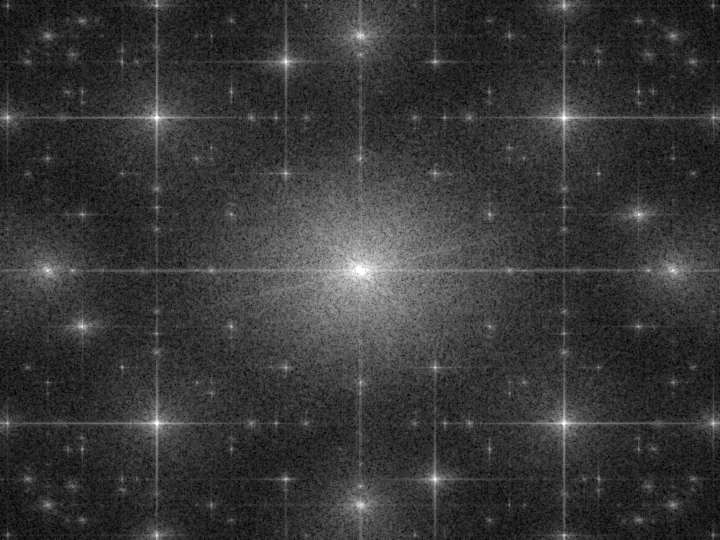
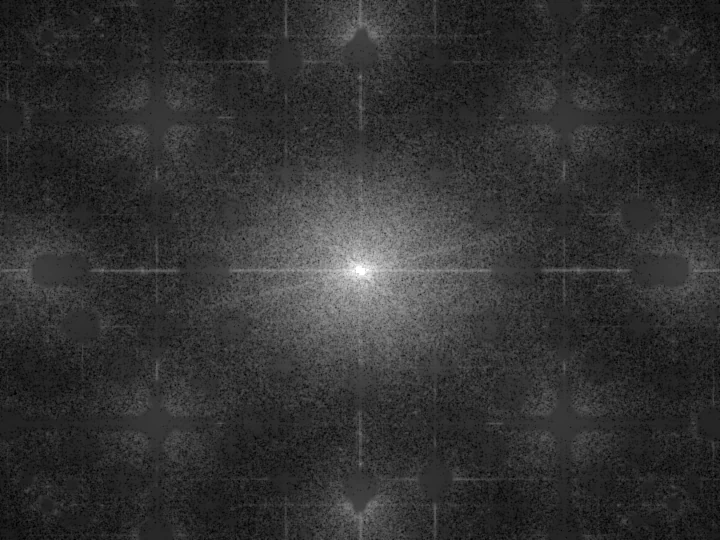
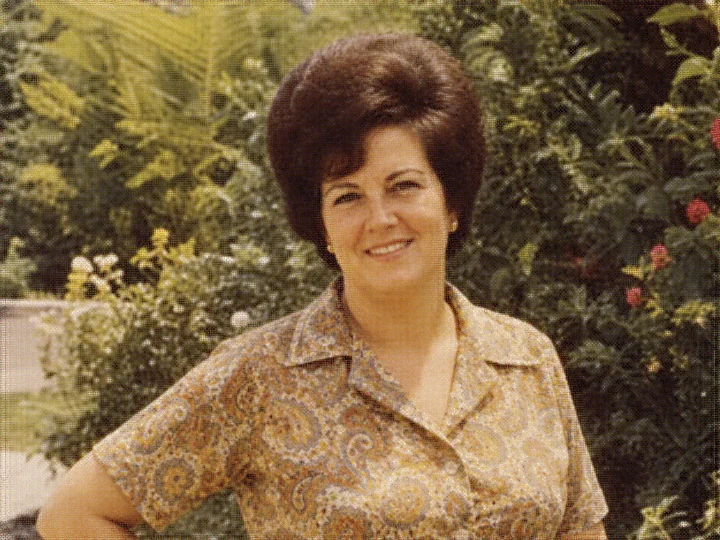
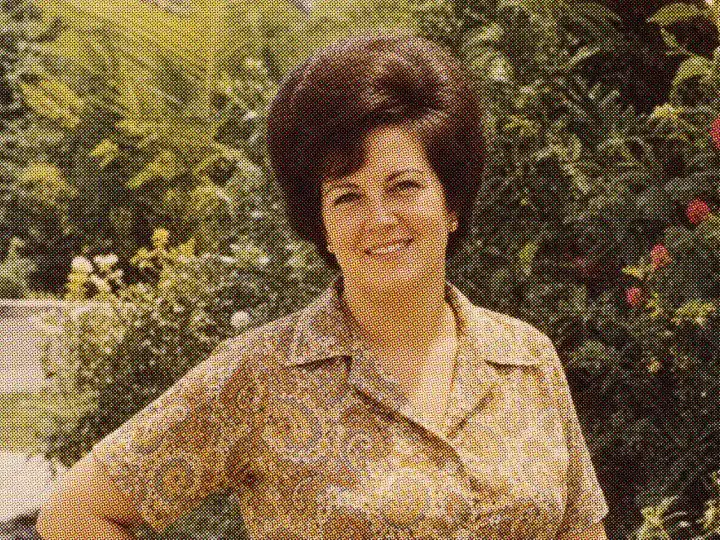
The idea: a Fourier transform turns an image into its spatial frequencies. The real picture concentrates around the bright center of the spectrum; a regular pattern repeats at one fixed spacing, so it appears as a few sharp, bright spikes away from the center. Paint those spikes out, run the inverse transform, and the pattern is gone while the picture keeps its detail.
Option A: G'MIC-Qt Fourier Transform (works with GIMP 3)
G'MIC-Qt is a free filter plug-in with GIMP 3 builds. As of October 2026, the G'MIC download page lists G'MIC 4.0 plug-ins for GIMP 3 on Windows and Linux; on macOS it is installed through MacPorts or Homebrew.
- Flatten the image (Image > Flatten Image) so there is a single layer.
- Open Filters > G'MIC-Qt and choose Frequencies > Fourier Transform. Apply it once. The layer is replaced by two layers, named with [FFT Magnitude] and [FFT Phase]. Don’t rename them: G'MIC stores the scaling it needs for the inverse in the magnitude layer’s name.
- On the magnitude layer, find the bright spikes away from the center. Leave the central glow and the thin horizontal and vertical cross through it alone; that is your actual image.
- Paint over each spike (and its mirror twin on the opposite side) with black or the dark gray around it, using a soft brush slightly larger than the spike.
- Open G'MIC-Qt again, set Input layers to All so both FFT layers go in, and apply Fourier Transform a second time. That runs the inverse transform and gives you the cleaned image.
Shortcut filters in the same plug-in: Repair > Descreen (by Andreas Påhlsson) detects and masks the spikes automatically in each CMYK channel, with Circle Radius, Cross Length and Cross Width settings that protect the center of the spectrum. Repair > Moire Removal (by Iain Fergusson) combines edge-protected smoothing with a frequency check, with Smoothing, Smart Threshold and a Smart, Aggressive or Smooth only method. Frequencies > Fourier Analysis just displays the spectrum.
Option B: The Fourier plug-in (FFT Forward and FFT Inverse)
Rémi Peyronnet’s Fourier plug-in is the classic tool behind this method; its own notes describe removing moiré from images scanned from books. It adds Filters > Generic > FFT Forward and FFT Inverse. A GIMP 3 port was released in November 2024 (0.4.5+gimp3rc1, with Windows binaries; Linux users build it from source). Its binaries are tied to GIMP versions, so if it doesn’t load in your GIMP 3 build, use G'MIC-Qt instead.
- Make sure the image is RGB (Image > Mode > RGB) and has no alpha channel (Image > Flatten Image).
- Run Filters > Generic > FFT Forward. The plug-in sets your foreground color to neutral gray (128, 128, 128), which means “zero” in its spectrum.
- To see the spikes better, duplicate the layer and raise Colors > Brightness-Contrast on the copy, select the spikes with the Rectangle or Ellipse Select tools, then delete the copy (the selection stays).
- Fill the selection with the gray foreground color (Edit > Fill with FG Color), or simply paint over the spikes with it, then select none.
- Run Filters > Generic > FFT Inverse.
GIMP 3.0 built-in options (no plugin)
- Filters > Enhance > Despeckle: a median filter that, according to the GIMP manual, also reduces moiré in images scanned from magazines. Start with a small Radius (1 to 3); the Recursive options repeat the filter for a stronger effect.
- Filters > Blur > Gaussian Blur, Median Blur or Selective Gaussian Blur on a duplicate layer with a layer mask, for mild moiré in a limited area.
- Color-only blur: duplicate the layer, blur it, and set its mode to LCh Color. It is GIMP’s equivalent of Photoshop’s Color blend trick for color moiré.
How to remove moiré scan lines on a white photo in GIMP 3.0
Faint gray lines or wavy bands on white paper, a white wall or a white background are common in scans and screenshots of documents. Because the pattern is only a little darker than the paper, you can often remove moire scan lines on white photo areas in GIMP 3.0 without any plugin. (If you were hunting for a GIMP 3.0 plugin to remove moire on white backgrounds, G'MIC-Qt’s Repair > Descreen above is the closest thing; try Levels first.)
- Open Colors > Levels.
- Drag the white Input Levels handle to the left until the gray bands turn white. Watch light details such as pale text or a light gray logo; stop before they fade.
- Optionally nudge the black handle right to keep text dark, then click OK. Colors > Curves does the same with more control.
- If the lines also cross a photo on the page, select only the white background first (Select > By Color, or select the photo and invert the selection), or use the Fourier method above.
- For pure black-and-white text documents, Colors > Threshold removes everything lighter than the text in one step.


How to Avoid Moiré Next Time
Fixing moiré always costs a little quality, so it pays to prevent it. The full list of causes and prevention tips is in what is a moiré pattern; these are the habits that make the biggest difference:
- Check at 100% before you leave. Moiré is often invisible on a camera’s rear screen. Zoom in on fabric and screens right after the shot.
- Change the geometry, not the settings. Tilting the camera a few degrees, stepping back and zooming in, or changing the distance moves the moiré more than any setting.
- Soften the finest detail slightly: stop down a little (for example f/8 instead of f/4) or shoot at a focal length that renders the pattern larger or smaller.
- Take a screenshot instead of photographing a screen whenever you can.
- Scan prints high, then go small: scan at 600 to 1200 DPI, descreen or FFT-clean the full-size scan, and only then scale it down.
- Shoot raw so Lightroom or Camera Raw have the most data to work with.
Similar Problems That Aren’t Moiré
Blocky squares and halos around edges are JPEG compression: use Remove JPEG Artifacts. Random speckles in a night shot are noise, handled by Denoise Image and our guide on how to fix grainy photos. A soft, smeared photo needs Unblur Image, a small low-resolution file needs the image enhancer, and bright reflections on a screen or glass call for the glare remover.
Frequently Asked Questions
What is the easiest way to remove a moire pattern from a photo?
Upload the photo to an AI moire remover such as Moire Fix, choose the source (screen, fabric or printed scan) and download the result. For scanned magazines, newspapers and books, use a descreen tool instead. Photoshop, Lightroom and GIMP can reduce moire too, but they need masking, brushing or frequency editing, and most manual methods soften some detail.
What is moire in Lightroom?
In Lightroom, Moiré is the name of a slider in the local adjustment (masking) panel. You paint a Brush mask over the area with wavy or rainbow bands and move the Moiré slider to the right; Lightroom then smooths the false color in that area. There is no global moire slider in the Basic or Detail panels, and the slider mainly targets color moire, so faint gray ripples can remain.
How does the GIMP Fourier transform moire method work?
A moire or halftone pattern repeats at a fixed spacing, so in the image’s Fourier transform (FFT) it shows up as a few bright, sharp spikes away from the center. In GIMP you run a forward FFT with G'MIC-Qt (Frequencies > Fourier Transform) or the Fourier plug-in (Filters > Generic > FFT Forward), paint over those spikes, and run the inverse transform. The pattern disappears while the rest of the picture stays sharp.
Is there a GIMP 3.0 plugin to remove moire on white backgrounds?
GIMP 3.0 has no dedicated moire filter, but two free plug-ins work with GIMP 3: G'MIC-Qt (its Repair > Descreen and Repair > Moire Removal filters, plus Frequencies > Fourier Transform) and Rémi Peyronnet’s Fourier plug-in, which has a GIMP 3 port. For faint scan lines or moire on a white page you often need no plugin at all: Colors > Levels, with the white input point moved left, turns the light-gray bands into clean white.
How do I reduce the moire effect in Photoshop without losing sharpness?
Blur only the color, not the brightness. Duplicate the layer, apply Filter > Blur > Gaussian Blur until the color bands merge, set the layer’s blend mode to Color, then mask it so it only covers the moire. You can also paint Moiré Reduction with the Brush in the Camera Raw Filter. Both keep edge detail because luminance is untouched; gray (luminance) moire needs a frequency method or an AI tool.
Why does Lightroom moire reduction leave gray lines behind?
The Lightroom moire slider works on color aliasing: it removes the magenta, green and rainbow tints but leaves brightness ripples mostly alone. Photographers on Adobe’s forums report exactly this, and on strong patterns even a value of 100 changes little. For the remaining gray pattern, try the Noise slider in the same mask, a Fourier transform in GIMP, or an AI moire remover.
Can I remove moire from scanned magazines and printed photos?
Yes. Scans of printed pages carry a halftone dot screen, and the FFT method in GIMP was originally used for exactly this kind of scan. A descreen tool does it automatically: upload the scan, pick the printed material (magazine, newspaper, comic or photo print) and download the cleaned image. Next time, scan at 600 to 1200 DPI and reduce the size afterwards.
Does GIMP have a moire removal filter built in?
Not a dedicated one. GIMP 3’s built-in options are Filters > Enhance > Despeckle, which the GIMP manual says reduces moiré in images scanned from magazines, plus the Gaussian, Selective Gaussian and Median blurs and the LCh Color layer mode for color-only blurring. For real frequency-based removal you add G'MIC-Qt or the Fourier plug-in.
More Photo Fix Guides
- Moire Fix: remove moiré from screen photos, fabric and printed scans.
- Descreen: clean halftone dots and moiré from scanned magazines, books and newspapers.
- What is a moiré pattern?: why moiré forms and how to avoid it.
- How to fix grainy photos: reduce noise without the waxy look.
Photoshop, Lightroom and Camera Raw are trademarks of Adobe Inc. GIMP and G'MIC are free, open-source projects. EzImgMaker is not affiliated with Adobe, the GIMP project or the G'MIC team. Software steps reflect Lightroom Classic, Camera Raw, GIMP 3 and G'MIC 4.0 as of October 2026; menus can change between versions. The FFT, color-blur and white-page examples are demonstrations made with short Python scripts on simulated scans; the Moire Fix and Descreen pairs are demo images from those tool pages.